I recently decided to move away from using Excel 2007 to manage my team's shift rota's. I wanted to use a shared Calendar in Outlook 2007, but had problems using categories as a method of changing the way items looked. If you research on the Internet for how to use Microsoft Office Categories to manage the way your shared calendars work, you will find mixed results on how to achieve this. It seems since office 2007 categories can no longer be exported between machines as in previous versions of Outlook.
I wanted Outlook to automatically colour the entries depending on what they were (Holiday, Early shift etc). Seems that when you implement category rules this only applied to your own Outlook profile, therefore when shared between the team they cannot see any of the custom colour attributes.
I have found a nifty way around this problem via the use of Outlook Views. My steps are below on how to implement a shared Outlook calendar with custom views:
First create the Shared Calendar:

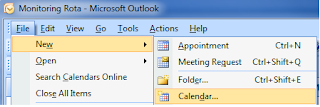
Get the calendar visible under your own Outlook profile first selecting option File> New Calendar. Once this is available we then need to make a copy of the current view so we can modify it to suit our needs.
I wanted Outlook to automatically colour the entries depending on what they were (Holiday, Early shift etc). Seems that when you implement category rules this only applied to your own Outlook profile, therefore when shared between the team they cannot see any of the custom colour attributes.
I have found a nifty way around this problem via the use of Outlook Views. My steps are below on how to implement a shared Outlook calendar with custom views:
First create the Shared Calendar:

Get the calendar visible under your own Outlook profile first selecting option File> New Calendar. Once this is available we then need to make a copy of the current view so we can modify it to suit our needs.
Next Step - use the Custom View organiser:
Before we make any changes to the current view it's best to make a copy and modify this one. So select the following option:

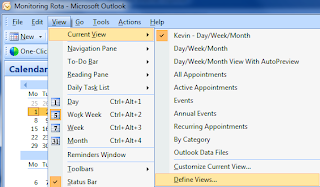
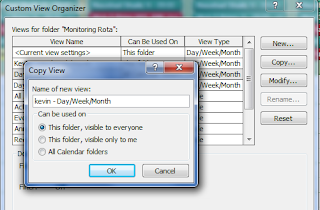
View > Current View > Define Views. Once here we need to select the default view (normally Day/Week/Month) and select the "Copy" option.
Make sure you select the "This folder, visible to everyone" option as this will then make the view selectable by everyone you share the calendar to (you will see where later on):

Customise the way the View will work:
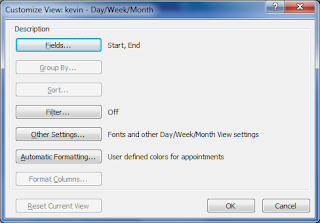
Next Outlook allows you to control the way in which the View works with data that is added and displayed in the shared calendar. After clicking "OK" on the above dialog box it will present you with the "Customize" option below:

Here Click on the "Automatic Formatting" option:
In this dialog you define each view rule condition by giving it a name, and Colour, then set the "Condition" by clicking this button:
Finally Apply the view to the Calendar:
Click on "Apply View" which will save the view configurations to your Outlook Profile. Then right Click your Calendar and select "Share . Send it to your team mates and they will be able to open it.
Then can then select View > Current View > "Kevin - Day/Week/Month" in my case which will automatically change the colours depending on the text in the "Location" field:


No comments:
Post a Comment
Please leave me a comment.
Note: only a member of this blog may post a comment.